So! You want to do some PWM lighting magic on the launchpad, but do not feel like getting into the whole spookyness of messing with the timers (or the watchdog timer since we are on the subject)? Well, to side step that, we can take for instance software to do this magic for us.
What is PWM you may ask yourself? PWM stands for Pulse Width Modulation, and in laymans terms it really ends up for the instance of lighting leds, a way of blinking them in a fashion that makes it look like it brightens or dims the led. You have to use PWM if you want leds to flicker or dim.
Why do it this way? Well first we need to look at some rather drab (but required) information on lighting leds.
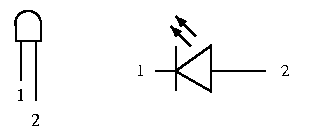
In Figure 1 we have the schematic symbol for an LED. First thing you need to know is that on the left side of this schematic, leg 1 is short, which on an actual LED will always indicate negative (Rather it indicates more than that, but that's out of the scope of this discussion. We will get into that as I get deeper into this blog). Leg 2 on the other hand, indicated positive. This is characteristic of ALL leds.
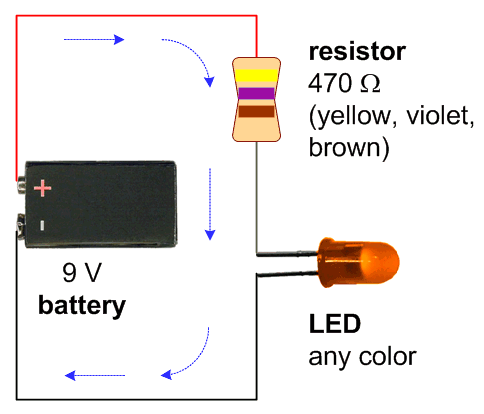
In Figure 2, we have another led, but this time in a circuit. I have no idea if that value of resistor is correct to properly light an LED, but I know it will work. In my experience, most information out there will tell you to use a resistor on the positive end of the LED (and do so for each LED), however what I like to do, is multiply the resistance needed by the amount of LEDS you need to light, and use ONE resistor on the ground side. Also as a side note, I ONLY do this in prototyping. I don't recommend this for production, or once you solder your stuff on a board, just because well... The professionals say not to, so I wouldn't risk it for fear that you finally get the darned thing together, and then a week later your leds start burning out because of too much, or not enough resistance to each led which would entail you having to pull the solder from the board, and replacing the leds and then it may be too late to add the proper leds...
Now back to PWM! Watch the video!
This is a real crappy example just fyi, but it's simple. This was done with an Arduino, but it's the same concept. Only in this version, the light blinks, and we only see a line where it's lit which makes the text shown. If this were standing still, you would only see the lights brightening and dimming.
The reason why you can't just cut power down to an LED is that it simply wont work... Well it will.... for about a minute, and then you will have a smoked/broken LED. Worthless really.
So as a way to get it to 'dim' for our human eyes, we simply make them blink on for a moment, and then turn off for a moment that makes our eyes think it's dim, because our eyes actually cant judge the speed that the LED is lighting.
Here is what LED PWM looks like in software(for TI launchpad gcc. Replace P1OUT with DDRB for Atmel gcc):
int i = 0;
int a = 1000;
for(i = 0; i < a; i++) {
P1OUT |= 0x01;}
for(i = 0; i < a; i++) {
P1OUT &=~ 0x01;}
a--;
if(a <10){a = 1000;}
In this example, P1.0 will light for 1000 clock cycles and then will turn off for 1000 clock cycles. After each sequential light up and turn off, the light will stay on and off for a -1 clock cycles. Once a is 9 or less, a will be returned to 1000, and the sequence will start over again. This (should) result in the led going from bright to dark and once the sequence finishes, the led will start back at the brightest it can get and dim back down.
PWM in software is a GREAT way to learn about a lot of different things with programming and lighting leds and using microcontrollers that I feel is a much better step forward after the "light for one second, turn off for one second hello world" application, because this is something that makes you go ooooo, instead of looking at the code to light the led, and after the honeymoon phase of going oooh, I made it light up!
Whoops! Forgot to add the code for this post! Sorry bout that. Here it is:
/*pwm_software.c
* Software PWM example
* Free as in free coffee! <|0.o|>
* Hardware Hacking Honkey 2012
* http://honkeyhacker.blogspot.com/
* No external hardware needed, just the launchpad board.
*/
#include <msp430g2553.h>
void main(void) //Main for loop for the cause
{
WDTCTL = WDTPW + WDTHOLD; // Stops the Watch Dog Timer(WDT)
P1DIR |= 0x01; // Sets P1.2 to output
P1DIR |= 0x40; // Sets P1.6 to output
int a = 1000; //on time for P1.2, off time for P1.6
int b = 0; //on time for P1.6, off time for P1.2
int flip = 0; //variable we will use to change pwm brightening and darkening
int i = 0; //variable used in for loops.
for(;;) //For loop to infinity and beyond
{
for(i=0;i<a;i++){} //for loop wastes time
P1OUT |= 0x01; //turn on P1.2
P1OUT &=~0x40; //turn off P1.6
for(i=0;i<b;i++){} //for loop wastes some time
P1OUT &=~0x01; //turn off P1.2
P1OUT |= 0x40; //turn on P1.6
if(flip==0){a=a-2;b=b+2;} //if flip = 0, decrement time P1.2 is on and increment time P1.6 is on
if(flip==0 && a<0){flip=1;} //if P1.2 is on all the way, and P1.6 is off, then let's go backwards
if(flip==1){a=a+2;b=b-2;} //if flip = 0, decrement time P1.6 is on and increment time P1.2 is on
if(flip==1 && a>1000){flip=0;} //if P1.6 is on all the way, and P1.2 is off, then let's go forwards
if(flip==0 && a > 800){a=a-2;b=b+2;} //used to speed up lighting 1.2 and dimming 1.6 in the beginning
if(flip==1 && b > 800){a=a+2;b=b-2;} //used to speed up lighting 1.6 and dimming 1.2 in the beginning
}
}
What is PWM you may ask yourself? PWM stands for Pulse Width Modulation, and in laymans terms it really ends up for the instance of lighting leds, a way of blinking them in a fashion that makes it look like it brightens or dims the led. You have to use PWM if you want leds to flicker or dim.
Why do it this way? Well first we need to look at some rather drab (but required) information on lighting leds.
 |
| Figure 1 |
 |
| Figure 2 |
In Figure 1 we have the schematic symbol for an LED. First thing you need to know is that on the left side of this schematic, leg 1 is short, which on an actual LED will always indicate negative (Rather it indicates more than that, but that's out of the scope of this discussion. We will get into that as I get deeper into this blog). Leg 2 on the other hand, indicated positive. This is characteristic of ALL leds.
In Figure 2, we have another led, but this time in a circuit. I have no idea if that value of resistor is correct to properly light an LED, but I know it will work. In my experience, most information out there will tell you to use a resistor on the positive end of the LED (and do so for each LED), however what I like to do, is multiply the resistance needed by the amount of LEDS you need to light, and use ONE resistor on the ground side. Also as a side note, I ONLY do this in prototyping. I don't recommend this for production, or once you solder your stuff on a board, just because well... The professionals say not to, so I wouldn't risk it for fear that you finally get the darned thing together, and then a week later your leds start burning out because of too much, or not enough resistance to each led which would entail you having to pull the solder from the board, and replacing the leds and then it may be too late to add the proper leds...
Now back to PWM! Watch the video!
This is a real crappy example just fyi, but it's simple. This was done with an Arduino, but it's the same concept. Only in this version, the light blinks, and we only see a line where it's lit which makes the text shown. If this were standing still, you would only see the lights brightening and dimming.
The reason why you can't just cut power down to an LED is that it simply wont work... Well it will.... for about a minute, and then you will have a smoked/broken LED. Worthless really.
So as a way to get it to 'dim' for our human eyes, we simply make them blink on for a moment, and then turn off for a moment that makes our eyes think it's dim, because our eyes actually cant judge the speed that the LED is lighting.
Here is what LED PWM looks like in software(for TI launchpad gcc. Replace P1OUT with DDRB for Atmel gcc):
int i = 0;
int a = 1000;
for(i = 0; i < a; i++) {
P1OUT |= 0x01;}
for(i = 0; i < a; i++) {
P1OUT &=~ 0x01;}
a--;
if(a <10){a = 1000;}
In this example, P1.0 will light for 1000 clock cycles and then will turn off for 1000 clock cycles. After each sequential light up and turn off, the light will stay on and off for a -1 clock cycles. Once a is 9 or less, a will be returned to 1000, and the sequence will start over again. This (should) result in the led going from bright to dark and once the sequence finishes, the led will start back at the brightest it can get and dim back down.
PWM in software is a GREAT way to learn about a lot of different things with programming and lighting leds and using microcontrollers that I feel is a much better step forward after the "light for one second, turn off for one second hello world" application, because this is something that makes you go ooooo, instead of looking at the code to light the led, and after the honeymoon phase of going oooh, I made it light up!
Whoops! Forgot to add the code for this post! Sorry bout that. Here it is:
/*pwm_software.c
* Software PWM example
* Free as in free coffee! <|0.o|>
* Hardware Hacking Honkey 2012
* http://honkeyhacker.blogspot.com/
* No external hardware needed, just the launchpad board.
*/
#include <msp430g2553.h>
void main(void) //Main for loop for the cause
{
WDTCTL = WDTPW + WDTHOLD; // Stops the Watch Dog Timer(WDT)
P1DIR |= 0x01; // Sets P1.2 to output
P1DIR |= 0x40; // Sets P1.6 to output
int a = 1000; //on time for P1.2, off time for P1.6
int b = 0; //on time for P1.6, off time for P1.2
int flip = 0; //variable we will use to change pwm brightening and darkening
int i = 0; //variable used in for loops.
for(;;) //For loop to infinity and beyond
{
for(i=0;i<a;i++){} //for loop wastes time
P1OUT |= 0x01; //turn on P1.2
P1OUT &=~0x40; //turn off P1.6
for(i=0;i<b;i++){} //for loop wastes some time
P1OUT &=~0x01; //turn off P1.2
P1OUT |= 0x40; //turn on P1.6
if(flip==0){a=a-2;b=b+2;} //if flip = 0, decrement time P1.2 is on and increment time P1.6 is on
if(flip==0 && a<0){flip=1;} //if P1.2 is on all the way, and P1.6 is off, then let's go backwards
if(flip==1){a=a+2;b=b-2;} //if flip = 0, decrement time P1.6 is on and increment time P1.2 is on
if(flip==1 && a>1000){flip=0;} //if P1.6 is on all the way, and P1.2 is off, then let's go forwards
if(flip==0 && a > 800){a=a-2;b=b+2;} //used to speed up lighting 1.2 and dimming 1.6 in the beginning
if(flip==1 && b > 800){a=a+2;b=b-2;} //used to speed up lighting 1.6 and dimming 1.2 in the beginning
}
}
No comments:
Post a Comment